Welcome to the Sunbeam Steam Iron Manual‚ your comprehensive guide to understanding and utilizing your steam iron effectively. This manual covers key features‚ safety precautions‚ and maintenance tips to ensure optimal performance and longevity of your appliance.
1.1 Overview of the Sunbeam Steam Iron
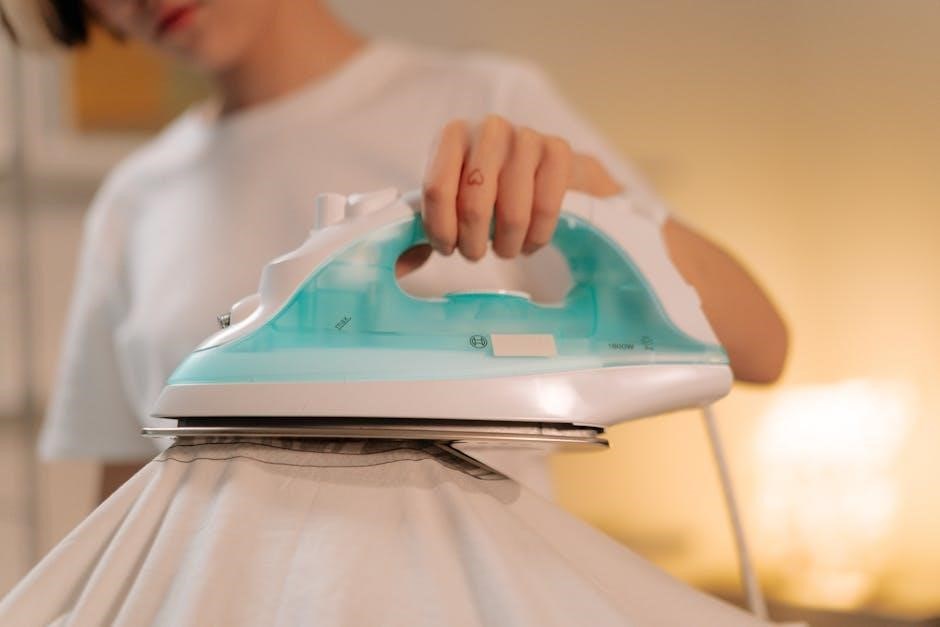
The Sunbeam Steam Iron is a versatile and efficient appliance designed to make ironing easier and more effective. It features advanced steam technology‚ adjustable temperature settings‚ and a durable soleplate for smooth gliding. With multiple steam settings and fabric-specific options‚ it ensures optimal results for various garments. The iron also includes safety features like automatic shut-off and anti-calc systems‚ making it both user-friendly and long-lasting. Its compact design and easy-fill water reservoir enhance convenience for everyday use.
1.2 Importance of the Manual for Optimal Use
Consulting the Sunbeam Steam Iron Manual is essential for safe and effective operation. It provides detailed guidance on using steam functions‚ temperature settings‚ and maintenance routines. The manual also outlines safety precautions‚ troubleshooting tips‚ and care instructions to ensure longevity. By following the manual‚ users can maximize the iron’s performance‚ prevent damage‚ and achieve professional-grade ironing results while maintaining their appliance in prime condition.

Key Features of the Sunbeam Steam Iron
The Sunbeam Steam Iron offers advanced steam settings‚ precise temperature control‚ and an anti-calc valve for optimal performance. It features safety elements like automatic shut-off and a secure soleplate lock.
2.1 Steam Settings and Functions
The Sunbeam Steam Iron features adjustable steam settings‚ allowing you to customize steam output based on fabric type. The Steam Burst function delivers a concentrated blast of steam to tackle tough wrinkles. An easy-to-use steam lever enables seamless switching between steam and dry modes. These functions ensure efficient ironing performance‚ while the anti-calc valve helps maintain steam quality over time. Always refer to the manual for optimal steam setting guidance.
2.2 Temperature Control and Fabric Settings
The Sunbeam Steam Iron offers precise temperature control with a dial that adjusts to various fabric types‚ such as cotton‚ silk‚ and wool. The fabric select dial ensures optimal heat settings for delicate or heavy-duty fabrics. Always refer to the manual for guidance on matching fabric types with recommended temperatures to prevent damage and achieve the best ironing results. This feature ensures safe and effective ironing for all materials.
2.3 Safety Features and Design Elements
The Sunbeam Steam Iron includes essential safety features like automatic shut-off and secure cord storage to prevent accidents. Its design ensures the iron remains cool to the touch on the exterior while maintaining high heat on the soleplate. The insulated handle and protective steam lever enhance user safety. Always follow the manual’s guidelines to ensure safe operation and avoid potential hazards‚ such as electric shock or burns from hot surfaces.
Safety Precautions
Always adhere to safety guidelines to avoid accidents. Keep the iron out of children’s reach and never immerse it in water. Avoid touching hot parts and ensure the steam lever is in the dry setting when not in use. Regular maintenance‚ like cleaning the anti-calc valve‚ is crucial for optimal performance and safety.
3.1 General Safety Guidelines
Always prioritize safety when using your Sunbeam steam iron. Keep it out of children’s reach and avoid touching hot metal parts or steam outlets. Ensure the iron is placed on a heat-resistant surface and never leave it unattended while in use. Regularly inspect the power cord and avoid using damaged cords. Follow all instructions carefully to prevent accidents and ensure safe operation.
3.2 Electrical Safety Tips
To ensure electrical safety‚ never submerge the iron in water or expose it to liquids. Always plug it into a 120-Volt AC outlet and avoid using damaged cords. Unplug the iron when not in use or before cleaning. Keep the cord away from hot surfaces and avoid overheating. Follow these guidelines to prevent electrical hazards and maintain safe operation.
3.3 Handling Hot Parts and Steam
Always handle hot parts and steam with caution. Use the steam function carefully to avoid burns. Never touch the soleplate or steam holes while the iron is hot. Allow the iron to cool before storing. Keep children away from hot surfaces and steam emissions. Proper handling ensures safe and effective ironing experiences while preventing accidents. Always prioritize caution when dealing with heat and steam.
Using the Sunbeam Steam Iron
Welcome to the usage section of the Sunbeam Steam Iron Manual. This guide will walk you through unpacking‚ plugging in‚ selecting fabric settings‚ and using steam functions safely and effectively for optimal ironing results.
4.1 Unpacking and Initial Setup
Start by carefully unpacking your Sunbeam Steam Iron and inspecting it for any damage. Ensure all accessories‚ like the water reservoir‚ are included. Before first use‚ plug the iron into a 120V AC outlet and set the Steam Lever to the “Dry” position. Allow the iron to heat up for a few minutes. Always handle hot parts with care and avoid touching the soleplate or steam holes. Follow the manual’s guidelines for initial setup to ensure safe and effective operation.
4.2 Plugging In and Powering Up
To power up your Sunbeam Steam Iron‚ plug the cord into a 120V AC electrical outlet. Ensure the Steam Lever is set to the “Dry” position before turning it on. Allow the iron to heat up for 2-3 minutes. Always keep the iron out of children’s reach and avoid leaving it unattended while powered on. Proper power setup ensures safe and efficient operation of your steam iron.
4.3 Selecting Fabric Type and Temperature
Use the fabric select dial to choose the appropriate setting for your fabric type. Adjust the temperature knob based on the material‚ ensuring it matches the recommended heat level. For delicate fabrics like silk or cotton‚ use lower temperatures‚ while heavier fabrics like linen require higher settings. Always refer to the fabric care label for specific guidance. Proper fabric and temperature selection ensures optimal ironing results and prevents damage to your clothes.
4.4 Activating and Adjusting Steam Functions
To activate steam‚ ensure the iron is plugged in and set to the appropriate fabric type. Fill the water reservoir with tap water‚ avoiding mineral-heavy water to prevent buildup. Turn the steam lever to the “Steam” position. Adjust the steam output using the control knob‚ increasing or decreasing as needed for different fabrics. Use the burst-of-steam feature for tough wrinkles by pressing the steam button. Always use distilled water for optimal performance and longevity.
Filling and Maintaining the Water Reservoir
Always unplug the iron before filling. Use tap water‚ avoiding mineral-heavy water. Fill to the max line to prevent spills. Regularly clean the reservoir and anti-calc valve to maintain steam efficiency and prevent buildup.
5.1 Steps to Fill the Water Tank
Ensure the iron is unplugged and cool.
Turn the Steam Lever to the Dry setting.
Locate the water reservoir fill hole.
Lift the Covered Water Fill Hole.
Pour tap water into the reservoir‚ avoiding overfilling.
Replace the cover securely.
Plug in the iron and adjust steam settings as needed;
5.2 Cleaning the Anti-Calc Valve
Turn off the iron and let it cool for 45 minutes.
Mix equal parts water and vinegar in a bowl.
Soak the anti-calc valve in the solution for 30 minutes.
Rinse thoroughly with clean water.
Reattach the valve and ensure it’s dry before use.
This process prevents mineral buildup and maintains steam efficiency.

Care and Cleaning
Regular maintenance ensures optimal performance. Clean the soleplate with a damp cloth and avoid abrasive cleaners. Descale using vinegar to prevent mineral buildup and ensure longevity.
6.1 Cleaning the Soleplate
Regularly clean the soleplate to maintain efficiency. Turn off and unplug the iron‚ letting it cool completely. Use a damp cloth to wipe away residue and stains. For stubborn marks‚ dampen a cloth with white vinegar and gently scrub the surface. Avoid harsh chemicals or abrasive materials that could damage the plate. Dry thoroughly before storing to prevent rust. This ensures smooth gliding and even heat distribution during future use.
6.2 Emptying and Drying the Water Reservoir
To maintain your Sunbeam steam iron‚ always empty the water reservoir after use. Turn off the iron‚ unplug it‚ and let it cool. Carefully pour out any remaining water into a sink. Use a dry cloth to wipe the reservoir interior and ensure no moisture remains. This prevents mineral buildup and bacterial growth. Regular draining and drying help preserve the iron’s performance and longevity‚ ensuring consistent steam output for future use.
Ironing Tips and Tricks
Master ironing with ease by using steam strategically‚ ironing fabrics inside out‚ and starting with lower heat for delicate materials. Achieve crisp results effortlessly.
7.1 Achieving Optimal Ironing Results
For optimal ironing‚ always iron fabrics inside out and start with lower heat settings for delicate materials. Use steam strategically to remove tough wrinkles; Clean the soleplate regularly to prevent residue buildup. Ensure the anti-calc valve is maintained to preserve steam efficiency. Ironing while fabrics are slightly damp enhances results. Store the iron safely after use‚ unplugged and out of children’s reach. Use distilled water to prevent mineral deposits.
7.2 Using Steam Effectively
To maximize steam potential‚ ensure the water reservoir is filled with tap water and the steam lever is set appropriately for your fabric type. Iron fabrics while they are slightly damp for better results. Use vertical steam for hanging garments like curtains or dresses. Always clean the anti-calc valve regularly to maintain steam flow efficiency. Avoid using hot water directly from the tap to prevent splashing. Proper steam usage enhances ironing efficiency and fabric care.
Troubleshooting Common Issues
Address common issues like leaks or low steam output by cleaning the anti-calc valve and ensuring proper water levels. Check power connections and fabric settings for optimal performance.
8.1 Resolving Leaks or Low Steam Output
To address leaks or low steam output‚ ensure the water reservoir is filled to the recommended level; Clean the anti-calc valve regularly to prevent mineral buildup. Check the steam lever setting and verify that the fabric type is correctly selected. For persistent issues‚ refer to the manual for detailed troubleshooting steps or contact Sunbeam customer support for assistance.
8.2 Addressing Temperature Malfunctions
If your Sunbeam Steam Iron experiences temperature malfunctions‚ start by unplugging it and letting it cool. Check the power source and ensure the iron is set to the correct fabric type. Verify the thermostat or temperature control knob is functioning properly. If issues persist‚ refer to the manual for reset instructions or contact Sunbeam customer support for professional assistance to restore optimal performance.
9.1 Final Tips for Longevity and Performance
Regularly clean the soleplate and anti-calc valve to prevent mineral buildup. Empty the water reservoir after use to avoid rust. Store the iron in a cool‚ dry place. Always unplug it when not in use. Follow the maintenance tips outlined in this manual to ensure your Sunbeam Steam Iron performs optimally for years to come.